How do you optimize your blog post, so that it generates the traffic you are looking for, as well as establishes you as an authority figure with Google?
It isn’t overly hard to write a blog post, but it does take time and thought to write one that is optimized for success. If it isn’t properly optimized to show up in search results, then your blog post really isn’t much more than a journal entry!
In other words, it isn’t likely to reach nearly as many people.
What good are your skills and expertise if you’re not reaching people who can benefit from it?
My Approach
I have studied numerous, and I do mean numerous… bloggers, creators, and influencers. There are always basic fundamental rules and tips that I come across often.
It’s because they work.
My aim is to give you a quick reference guide on everything I’ve learned from all of these different coaches, in one easy to understand article.
In this post, I’m going to show you step by step, through the process of creating and publishing an optimized blog post, from choosing a topic, through to the last step of indexing your post so that Google sees it.
Spicyrockingchair.com is a participant in the Amazon Associates Program. Some of the links within this post, are affiliate links. This means that, at zero cost to you, I may earn a small commission if you click through any of those links and finalize a purchase. I only recommend products or services that I have used or are of high quality. Read the full disclosure here. Thank you for your continued support!
1. Choose a topic to write about
If you have a general idea what you are considering for a topic, it’s always best to verify before beginning. By that I mean, using search engines to get a better idea to what folks are currently looking for.
You can do this by entering in the search box of Google, the beginning keyword or phrase that best describes your topic.
For example: I know I want to write about recipes, but not sure exactly what type of recipes. I might type in the word “Recipes” as shown below.
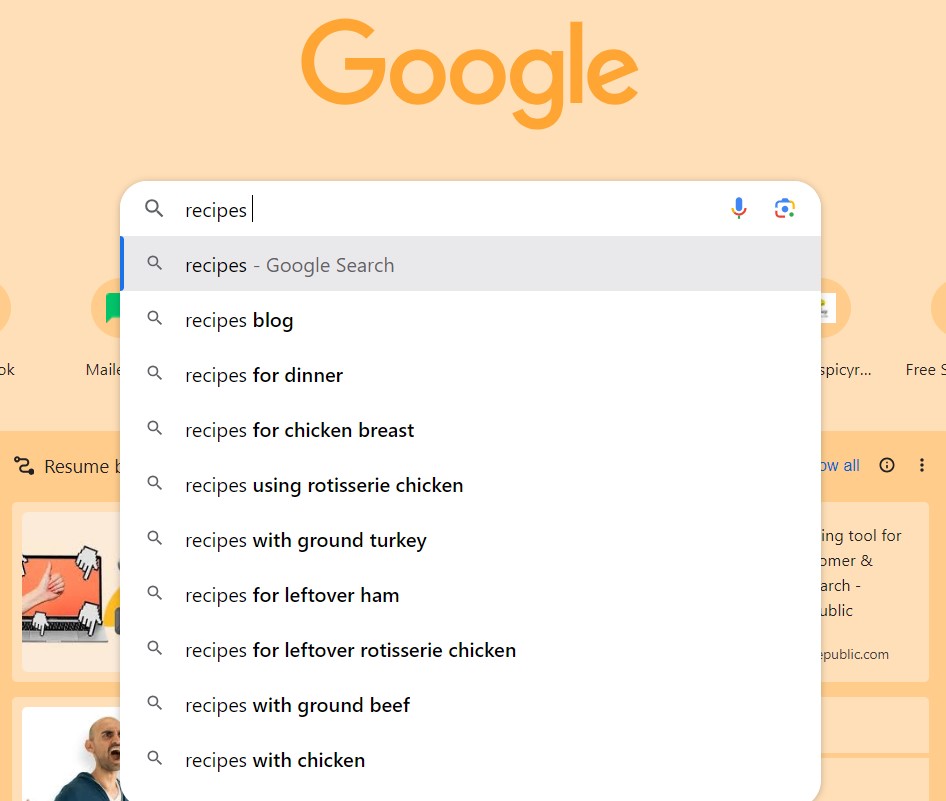
Once I typed the word in, you can see Google comes up with the suggested end phrases of, “..for dinner.” or “using rotisserie chicken”, or “with ground turkey”,…and so on.
That tells me people are searching for those particular types of recipes, and by choosing one of those topics, I will likely generate more traffic.
I use Google in this fashion, for ideas, as well as Youtube and Pinterest. You may find more favorable results with one search method over the other, depending on which platform generates more traffic to your site.
I generate quite a bit of traffic from Pinterest, so it is only natural I would pay attention to their search results a bit more.
(Some advice I’ve come across, says to use Incognito mode when doing these searches. I’m not sure it really matters much. If I’m dealing with a topic I’ve searched often, I might check it out incognito, to be sure I’m getting an unbiased search.)
For an even more specific topic idea…
Click on one of the suggested results Google (or other search engine) finished with, and see what they are.
As in the photo below using the “Recipes with ground turkey” option, you will see things like, Orange ground turkey recipes, 30 minute meals with ground turkey, nice and hearty ground turkey recipes, etc.
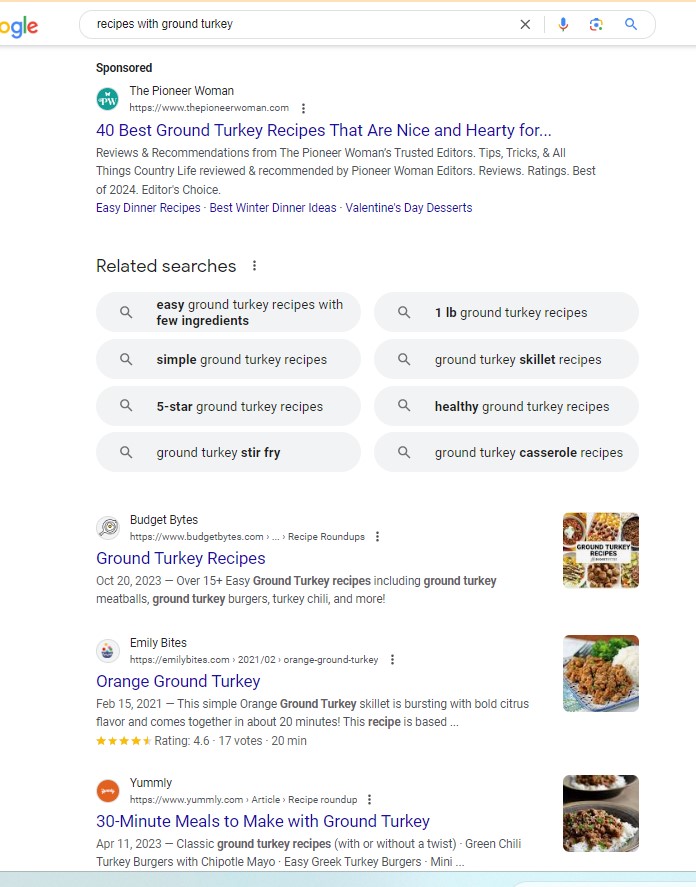
Tip – When trying to pick a topic, I ignore bigger websites like Reddit, Food Network or others like that. I tend to place a bigger focus on smaller websites that come in toward the top of the results. They are the ones that get the most exposure for that particular search query, that isn’t a major brand.

2. Research the topic of choice
The next thing I do is really browse through the top articles, to gain better insight on what specific problems people are looking to solve. I find the best way to do this, is to ask Google a question on the topic.
Instead of typing in the search bar, “Ground Turkey Recipes”, I start a new search with the question, “What are some recipes with ground turkey?”
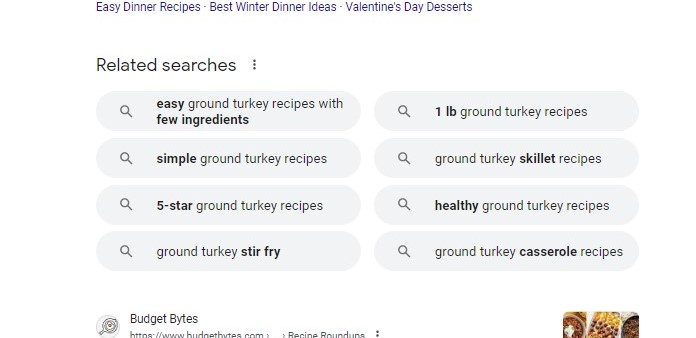
When Google comes back with the new results for that search, I take note of the “People also ask…” and the “Related Searches” areas, for some of that insight. Of course, I also browse through some of the articles for further research, but those are easy ways of gaining information.
3. Choose a compelling title
Once I have a better idea of the subtopics and pain points I will be covering in my article, it is time to choose a catchy title.
As I did above for discovering my topic, I will use the search engines to come up with a title as well. When I look at the titles of the top results, I note the keywords that are used in the title.
For example: One title points out that the article is about recipes that aren’t pasta, while another focuses on easy weekday meals. You get the point.
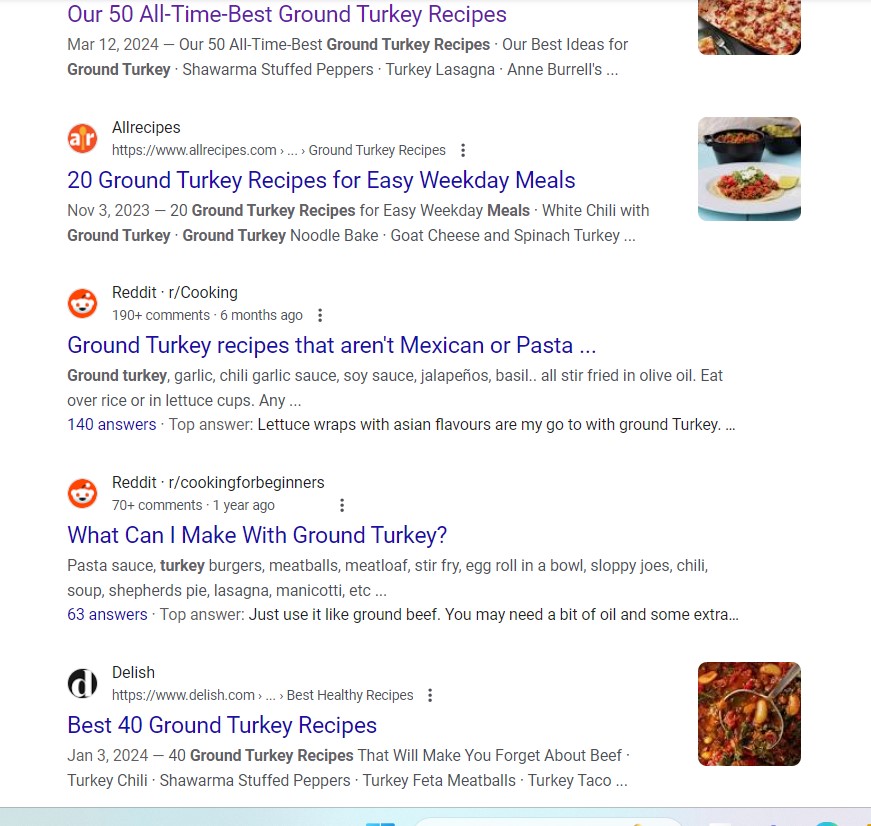
For the above example, I might go with a title like 20 Easy Ground Turkey Recipes That Are Perfect For Weeknights or 20 Easy Ground Turkey Recipes You’ve Never Tried Before.
FYI – Titles that are a little longer in length and more descriptive, are the titles Google seems to currently favor. It gives Google a more specific idea to what type of content you are offering.
The ideal blog post title is 50-60 characters.
***There are plug-ins out there that will give you a score on your title before publishing. I highly recommend this, as it really helps to make you better with titles, naturally.
I use Monster Insights for my headline analyzer, and love it!
Take a peek at this article for other headline plug-ins that are popular.
4. Create an outline
Creating an outline before you start writing, goes a long way toward making your blog post educational, engaging, and more importantly, coherent. If your article doesn’t flow harmoniously throughout, it might be confusing and hard to understand the main points.
I must admit, I didn’t always outline when I first started blogging. I really wish I had. It would have saved me from a lot of writer’s block. My posts have also become so much easier to understand, now that I organize my thoughts before diving in.
This is where I actually do use AI a bit. I just plug in my title, along with the keywords, and let the AI do the rest. Even if the outline isn’t exactly where I would have gone, it at least gives me a solid starting point for tweaking as I need to.
Naturally, this is where your subheadings will come into focus, for more structure.
***For a more hands on approach to creating an outline, this article here gives you step by step instructions on how to create a good outline without AI.
5. Research keywords
This step goes hand in hand with the outline step above. I continually collect keywords, phrases, and points while outlining my post. I then plug them into place as my topic comes into focus more. This is also the step in which I spend the most time reading, just to have a firm grip on all of the major points I want to address.

6. Write your introduction
At this point, you should have a fairly detailed outline of your blog post, and can begin turning your phrases and notes into fully structured sentences and paragraphs.
The introduction is very important, because if you don’t capture your reader’s attention within the first couple of sentences, there is a strong chance he/she may leave and find another article that more quickly addresses their issue.
There are several ways you can begin an article in a compelling way. One of the most common ways is by asking a question that directly corresponds with the solution you are about to provide.
For example, this article is all about writing an optimized blog post. I began by asking the question,
How do you optimize your blog post, so that it generates the traffic you are looking for, as well as establishes you as an authority figure with Google?
Other common ways are by using a quote, stating a fact, a statistic or even making a claim, such as,
In this article, I’m going to teach you how to optimize your blog post, for maximum reach and authority.
Once you’ve come up with a starting line, you will want to follow up with another sentence or two, elaborating a bit more on what your reader can expect to learn from you.
From there, you are ready to move on to the main body of your post.
Sometimes, I get really stuck on finding a good introduction. On occasion, I have started with the main body, before coming up with a good introduction.
More often than not, I try to at least have a sentence or two in, before moving on to the body. It just helps as I go along, to be able to refer back to a firm statement that summarizes the main point of my article.
When you're first starting out in the blogging world, it is really difficult getting noticed. Believe me, I know.
You've done all of this research.
You've taken a few courses.
You've watched endless youtube videos.
Yet, your pageviews look sad every month, on your reports. You begin to doubt yourself.
That's when it's best to seek a little help from the more experienced creators out there, who aim to teach you the ropes.
This particular ebook is a good start for anyone who's struggling to gain traffic. It covers all of the important SEO points, along with social media strategy and pinterest tips.
To go a little deeper into the lessons, grab the bundle, which is this ebook, "Boosting your blog traffic", as well as the full Pinterest tutorial, "Making Pinterest Possible".
The bundle offer is at the bottom of both link pages.
7. Write the body of your post
Now that you have your title, outline, notes, and introduction, you can really begin to construct the main part of your post.
If you run into a jam on connecting the information in a way that makes sense, go back and browse through a few articles that are similar to yours.
What additional types of questions did the authors answer? Any additional side tips they added in, here or there? Did they elaborate on any resources, or particular aspects that needed better understanding? Any recommendations related to the topic?
These are all things that can be helpful in connecting the various pieces of information, within your blog. Although I don’t recommend using AI for much of this part, it can be useful for inspiration. Sometimes, I can better see how to organize a paragraph, once I have seen an example given by the AI.
(In no way should you ever copy anyone’s work. This is merely for inspiration should you get stuck on filling in some of the blanks in your article.)
8. Add a conclusion with CTA
While writing a good conclusion can seem a bit daunting at times, it really is important. It could be the difference between someone who stops by your blog once, or someone who comes back again and again.
Your conclusion should typically involve a few lines that sums up all of the major points of your article, along with a strong CTA (Call of action).
Depending on what your goals are, your CTA might be asking the reader to share your article, or to leave a comment, or even to sign up for your newsletter. Whatever the case might be, it’s always wise to make sure you leave your audience with a next step for how to stay engaged.
If you get stuck, check out this article on 9 ways to write a conclusion.
9. Add graphics
The graphics are the next thing I add to my posts. Now that I’ve gotten all my words down pretty much how I want them, I start adding in photos, videos, listicles, infographics, charts, etc.
The objective is to add enough to break up the paragraphs, but not too much that it’s overwhelming.
10. Add in links, spacers, additional formatting
Now that I’ve gotten the rough draft of my article completed, I start adding in spacers where I feel they should go. I’ll add in links throughout the article wherever I feel necessary, and any other formatting I wish to tweak, to make the post look nicer and more engaging.
You can have the most beautiful article published, on a super popular topic, but without following these steps, your article may never get seen.
11. Proofread your post
The next thing I do, is give my post a good read through. I check out all of the links, to make sure they are working properly, grammar, punctuation, subheadings, formatting, placement of graphics, etc.
12. Add tags, and alt attributes to images
After I am comfortable with the post itself, I go through, and add in the Alt Attributes to my images, along with any tags I want at the end of the post.
It is very important to add the alt attributes, so that Google can determine what the image is about. For a better description of what alt attributes are and do, check out this article here.
13. Choose a featured photo and category
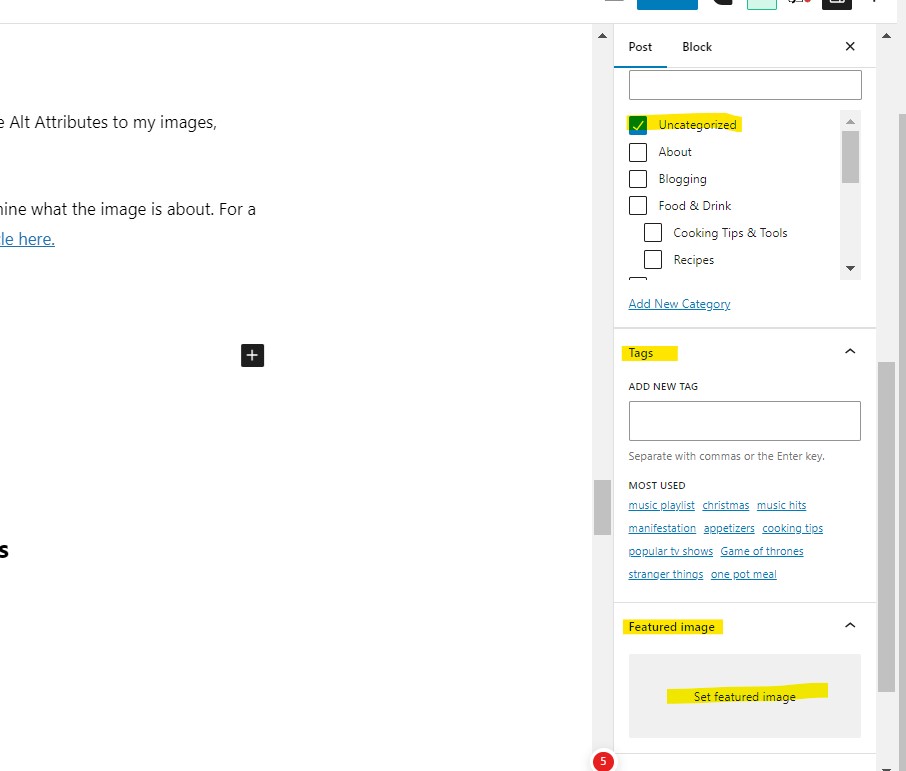
The next thing I do is select a featured photo that I want displayed, along with the category of my site that it should be published to. If you are using wordpress, these options can be found along the right hand side of your editor, as shown below.
14. Create a meta tag
Meta tags are small descriptive summaries that describe the context of an article. They are generally between 150-160 characters, and involve the major keywords you will want Google to see.
If I were to use the example from above, the ground turkey recipes, my meta tag for that article might say,
Easy ground turkey dinner recipes that are perfect for weeknights when you want something a little different.
As you can see, it’s short, sweet, and right to the point of the article.
15. Add in keywords
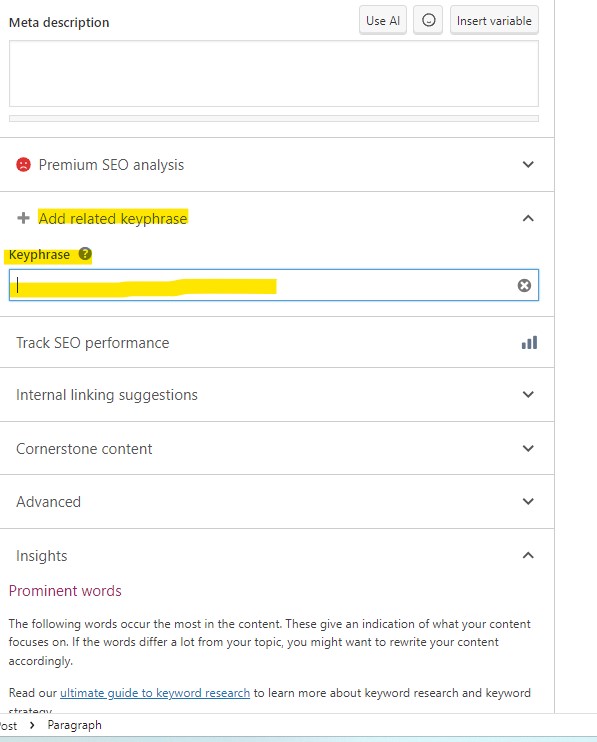
If you are using Yoast or another similar SEO plug-in, you have to add the keywords in, at the bottom of your post editor. Again, refer back to your outline and notes, for the keywords you discovered before. Plug those in where appropriate, as shown below.
16. Double check the SEO, title, and readability scores
Check over everything one more time, thoroughly. If you do use an SEO plug-in, chances are you are given a score or color coded indication of sorts, to let you know whether or not your title, keywords, or formatting need improvement.
17. Publish your post
Make any adjustments necessary and publish your post.
18. Indexing
Another crucial aspect to showing up on Google’s radar, is to “index” your site with them. In plain terms, this is really just you letting them know that your new blog post exists. With all of the millions of web pages born every day, you need to essentially tap Google on the back and say, “Hey guys, I’m here!”
This is done through Google Search Console. If you don’t already have an account for this, you should visit Google’s official instructions here to get started.
If you do have Google console, you will simply:
- Log in to your account
- Got to the top of any page, you will see a search option like the one below, asking for a URL to search.
- This is where you will put in the web address.

For example: www.goodfood.com/20-Easy-Ground-Turkey-Recipes-You’ve-Never-Tried-Before/
- Hit Enter on your keyboard. You will see a message, Retrieving data from Google.
- It will then come back with results of not being indexed. Click on the button that says, Request Indexing. (It will take a few minutes for the process to complete.)
- You will get a message that says it was completed, and not to submit more than once..lol!
Note: The article has to be published, to get indexed. It usually takes a few days for it to register with Google completely.
Promote your post
Promote your blog post wherever you will get eyes on it. For instance, I will immediately schedule a pin for the post, on Pinterest. I will also share it on FB and through my newsletters. If another social platform works better for you, that is where you will want to focus your promotion efforts more.
Final Thoughts
In the time I have been blogging, there is an extraordinary amount of information I have accumulated. In all of the tips, bits of advice, and opinions that I have come across, this checklist is one of the most important things to pay attention to, if you want your blog to succeed.
You can have the most beautiful article published, on a super popular topic, but without following these steps, your article may never get seen. Optimization is crucial, but easy to implement.
One thing is for sure. It matters if you want to get within Google’s view.
Top take aways to keep in mind
- Be engaging.
- Capture your audience quickly.
- Add keywords, questions, statements, statistics, etc, within first couple of sentences.
- Make sure your post flows coherently.
- Make sure you’re solving a problem.
- Don’t stress too much about perfection.
Don’t forget to sign up for my newsletter for your Free Blog Post Checklist!
Other Good Tips & Advice
- Blogging Tips, Tricks, & Advice For Beginners…Mistakes To Avoid
- 7 Best Headline Analyzer Tools for WordPress
- Best AI Content Generators in 2024
- How To Write a Blog Post Outline
- 9 Ways to Crush the End of a Blog Post
- Getting Started With google Search Console




Very helpful information! I usually get stuck on what to write in the intro. Thank you for sharing!
Agreed. The intro and sometimes, even the conclusion can be tough. I’m glad you enjoyed. Thanks for reading!